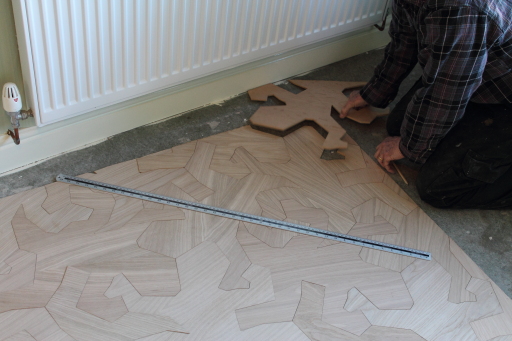
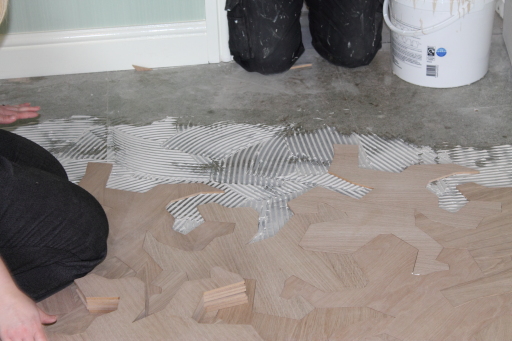
Laying day! Lots of photos, because you must be sick of me waffling on about it.
We started by dry-laying it all – working from a corner, cutting the edge pieces to size, and working along two edges. That way, a lot of the cuts were predictable repetitions.


Laying the ‘complete’ tiles (the ones that didn’t need cutting) was a delight – quite therapeutic, like an easy puzzle. There was a bit of movement when laying them, but as more were laid and pieces were surrounded on all sides by other pieces, then the jigsaw held itself together – they interlocked and held the structure.


Full credit for the labour should go to my father-in-law – I tried to help, but I suspect I was more of a hindrance. He watched me lay some wood adhesive, but after seeing how I performed on the first few tiles he took the scraper from me and wouldn’t let me do any more.

Our idea was to lift up sections of the dry-laid tiles, apply the adhesive to the floor, then relay the tiles. However …
To glue the tiles down properly, you obviously need to cover all the floor a tile will cover before you put it down. The tiles are hardly a conventional shape, so when you’ve put down a tile there’s still a lot of adhesive open to the air … so you need to put more adhesive down so that you can put another tile down. And so the problem repeats.
Also: the tiles can’t really be guaranteed to be in their ‘final’ place until all the neighbouring tiles have been laid (remember what I said about pieces interlocking?). So you don’t want to leave a tile without any neighbours for too long, or it may set in a less-than-perfect position.
All together, this means that when you start laying the tiles: you have to do it all in one go. No stopping for a break, or for lunch. I’m recovering from a shoulder replacement and have a knackered back. My father-in-law – thanks to multiple motorbike accidents, falling off a crane, a career working with fibreglass – has knackered arms, legs, carpal tunnel, knees, and industrial asthma.
So I think if I had to give advice to anyone who was thinking of doing this, I’d suggest:
- have multiple people on the job at once, if it’s a big room (buy more than one scraper), or have multiple people who can work in shifts
- have workers with a full set of working limbs
Fair play to my father-in-law, who spent the rest of the day popping pain killers! 🙁


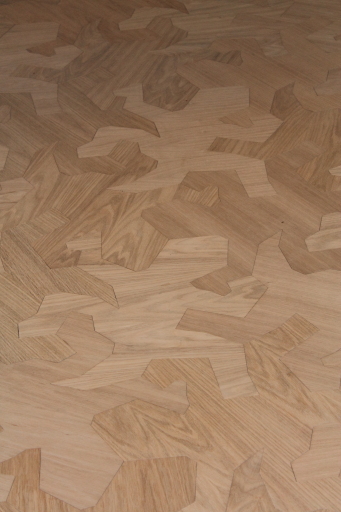
Laid and stuck down! Not varnished yet, but still looking fantastic! The contrasting grain directions really work well!

Various other family members were on-hand to stand on any tile which didn’t seem to lay flat, while it all set. The final floor still isn’t completely flat – but actually, I really like that, It reinforces that it’s made of individual tiles, rather than just tongue-in-groove laminate with a pretentious pattern.

And here’s a shot of applying the final (third) coat of varnish. We went for a satin-finish, as tough as we could possibly find. It was quite expensive – but it felt like a foolish and false economy to go to all this trouble to cut and lay it, and then just slap any old cheap rubbish on it.

Closing Notes
When calculating how many lizards to cut, I arrived at a figure of 195, which I then rounded up to 200. This was to cover a floor measuring around seven metres long by about three metres wide. I arrived at this figure back in the days when I tried to get a professional company to cut the tiles – I was paranoid about commissioning not quite enough. When it came to edges, I assumed “worst case” – that each lizard cut for an edging would only be used once.
In practice, lizards were cut with very little wastage. If you needed a head here, then you’d use a back leg over there, and the tail over there. Also, my dad had the foresight to use some leftover wood to cut some incomplete lizards (so we used those for edging before cutting up any complete ones).
Now the floor is laid, we still have 57 complete lizards surplus to requirements!
No idea what I’ll do with them – it seems a shame to throw them away, when someone could use them as a ‘feature wall’, or for the floor in the spare bedroom. Maybe I’ll stick them on eBay – I’d be happy if they only went for 99p, if it means they wouldn’t be wasted.
For those of you who have been following this saga as I’ve documented it – I hope you’ve enjoyed it. I’m terrible for starting projects but not finishing them, so I’m delighted that I’ve seen this one through.
Having a definite timescale and goal has helped – too many of my projects haven’t been finished just because I had never defined what “finished” would be! It’s also fair to say that this project wouldn’t have happened if I’d done it alone – without the help of my dad and my father-in-law, it would have been another one of my half-baked unfinished money pits.
Now I must think of other daft projects I can do with a CNC router. Stay tuned …
[Part 1] [Part 2] [Part 3] [Part 4] [Part 5] [Part 6] [Part 7]

That is one fantastic looking floor! Really enjoyed the write-up too – lots of interesting ideas in there for things I’d like to build. Thank you for sharing.
Awesome project. It turned out rely nice! Thanks for sharing it. Have you tried to make any other tessellating shaped with your little program?
What a great project! since you have so many left, put some finish on those and hag a couple on the wall and on the ceiling!!!
Awesome job!
I don’t usually comment on project, but this one I like… a lot.
Also the writeup was a joy to read. I usually forget to take pictures in the process of building things and end up with an finished yet totally undocumented end piece…
Super Amazing write up. Thanks for sharing your experience.
Any chance of you sharing your dxf files? I have made maybe 100 interlocking pieces similar to these and never had a problem with them not fitting up, but because you spent so much effort making sure, I might like to compare our results.
Also do you share your tesselating code? Very cool.
That floor looks fantastic!
Great project. I too have admired those floors that inspired yours, but I think that yours is certainly the most unique. The fact that you and your family put in the time and created such a nice floor should be a source of great pride for all involved. Thanks very much for sharing your project with us.
Amazing, thank you for the effort in showing everything.
Well done and congratulations to everyone involved.
awsome.
nice work.
This was a really good read. Thanks for writing up all of the steps (I have no doubt that there are another 5,000-odd peopleoids out there who are enjoying this just as much as I did, now that you’ve made Hackaday, BTW). Let us know when you put your extras up on eBay.
Great project! love the idea! I now really want a floor like this 🙂
maybe even with 3 diffent kinds of woods. *dream*
thanks for sharing! great work!
An incredible job! I love it.
I’m rebuilding my house compleetly, so I know what you went through!
Website is just a small piece of it, but you get an idea of it.
AND: I’ll build a very small guest-toilet, which will be a very perfect place to use your left over lizards. (or maybe even the corridor).
I would be very happy to make use of your work (cost of wood and postage to germany will be my cost, of course!).
Just drop me a line.
(Oh, and be patient, because it’ll be quite a while till I get to the rooms)
Would you believe, I put them up on eBay last week but they didn’t sell? Maybe I should relist them, now I’ve had a bit more exposure!
Years ago, I cut several puzzles for family and friends of the Escher lizard pattern, they are a big hit! In seeing your project, I have planned on doing this for my entry. How/where will you list on ebay? Or contact me by email.
Thanks so much.
I’d like to make you an offer on those you have left. Do you have a price in mind that you’d need for the total? You did a Terrific job, makes a real statement.
Thanks much
They were on hackaday, so maybe that’s a good idea. (mind to drop the ebay item number to find it?) . Ebay most likely didn’t work by itself, bacuase your work is hardly something one would search without any idea that something like that exists..
You can also drop me line via email. As said shipping and price of the wood is the minimum I would pay. But your choice anyway.
Just another question: would you mind to release the dxf file und some CC Licence? (we have a Fablab just started thixs week in my town. and they have a lasercutter :)).
Leftover tiles are now on eBay UK: http://www.ebay.co.uk/itm/221411101244
So shipping to UK only according to ebay?
Gah! And it won’t let me revise that particular part of the listing!
I’ll see about closing and relisting.
Awesome write up! I have a circular room that I need to redo the wood floors ( it is currently the sub floor) I like in a Frank Lloyd Wright house and would love to bring this design here. Is there any possible way I could purchase a set of these from you? I know youd probably have to make them but Please consider 🙂 Let me know what you think! Thanks!
Great job…can you tell me were you got the template from..
I made it. If you can stand it, read the other seven parts. Or if you don’t have time – just look at the pictures.
I am a quilter,and certainly not a genious, so I am asking for information I could not otherwise get.. What I am looking for is a template for Escher’s lizard. for a quilt pattern. I would not pass it on to anyone but I would be ever so grateful to have one for myself. It would make a great quilt . Would you send me a template either in snail mail or e-mail ? Either way, have a great day – and tomorrow too !!
Eleanor Cerny
Thanks for the great write-up. I have also built a CNC – “Nermil” – took me a year 🙁
Works like a charm – am using USB port and GBRL. Having tons of fun – now to figure out a pattern that I can cut so as to generate an income !!
Thanks for the inspiration …
Dean Webber – East London (South Africa)
Hi Have the responses to this blog inspired you to make more and flog them? If so, let me know cos I want some!
Heh. Unfortunately the Escher estate still pursue copyright infringement, so it wouldn’t be allowed. But the techniques I developed have been useful and interesting in other stuff I’m doing. If I could find an alternative shape design then there might be some mileage in it … but the lizard is quite iconic.
Hi, I really liked your write up on the flooring.
I was searching a few years back as I was thinking of doing the same when I found a local CNC cutter.
I recently read the whole thing through instead of just looking at the pics for inspiration and I have to say , well done.
I’d love to chat , quickly, so if you could reply to my email I’d really appreciate it.
Thanks for an interesting article.
Jason
Wat een geweldig idee!
I suggest you take the remaining tiles and recreate the three dimensional wall sculpture of the lizards coming out of the surface, walking around the room, and then re-entering the tessellation. (as per Escher’s original art work. It would be extremely cool to see that.