Heightmap carving/sculpting (also known as “relief carving” or “3D carving” or “Bas Relief”) is becoming increasingly popular amongst CNC hobbyists at the moment. It’s easy to see why:

Image courtesy of Imed Hassen.
That’s some sexy woodworking!
To make these images, the CNC moves the drill in a scanning “raster” movement: left-to-right, top-to-bottom. As it moves, it adjusts the height of the drill to cut to a certain depth. This can produce very intricate artwork, carved from a solid piece of material. Usually this is wood, but could equally be modelling foam, PVC, stone, or possibly a particularly solid cheese.
Here’s a Youtube video of it in action. These videos can be a surprisingly therapeutic thing to watch … as long as you turn the sound off.
(Full credit to Roger Webb, who has produced a very comprehensive set of Youtube videos about working with CNCs.)
Effectively, what was the domain of the highly-skilled sculptor is now the repetitive job of the CNC. From our point of view as CNC operators, our responsibility moves to the data-generation level – how we tell it what to sculpt!
Normally this work is done in multiple passes – for the first pass, a fairly large drill bit “roughs” it out. This gets rid of most of the material, and creates a sort-of “low-resolution” version of your design. Then you substitute a smaller drill bit, generate new data for the extra fidelity, and repeat the process. By removing most of the material first, it means you can subsequently use a much more delicate drill bit and not worry about snapping it.
It is a long process though – a big, complicated, fine design might demand a whole day of machining. Fortunately for the operator, this mostly consists of vacuuming-off the waste material and drinking a lot of tea.
But … where do we get the data from? I don’t mean the GCode – that needs to be generated by your favourite CNC application, and is very much dependent on your setup and the drills you want to use. I mean the source data – where do we get the nice image of an oriental dragon, or flowers, or a portrait of the dog?
Lets talk about the data
The drill cuts down from above – if you only have three axes, then you won’t be cutting from the side of anything, to make overhangs. So the shape to be sculpted can be represented as a two-dimensional grid of numbers, where each number is the height for that particular point.
The good news is that this can easily envisioned with a greyscale bitmap – a two-dimensional grid of numbers, where each number is the intensity of that pixel. The intensity (0 for black, up to 255 for white) can describe how high we’d like the drill to cut at that point. So the lighter a pixel is, the higher-up it should be. This means that creating the source data can be done in your favourite art package.
Here’s an example image:
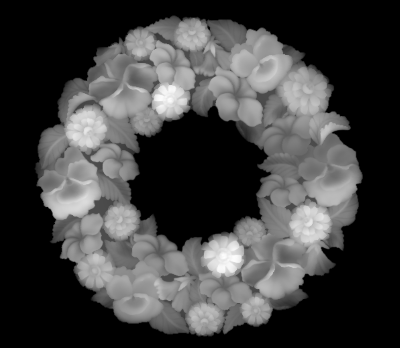
It may look like a ghostly X-ray, but you’ll soon learn to see it in terms of heights. Where the image appears to emerge from a ghostly black fog: that’s the background. That’s where the drill will cut the deepest. Where the picture becomes quite bright – that’s where the sculpt will be at its highest: in the foreground, closest to the viewer.
Studying the image, we can see that some of the flowers in this wreath are brighter – so they’ll be closest to the viewer. And the darker leaves, closer to the edges, will be in the background.
But how will this look in 3D? It can be hard to visualise 3D things on a 2D computer screen, so I’ve written some little utilities to illustrate how it works. The first takes a greyscale bitmap and turns it into a 3D model file. The second loads a 3D model file and then renders a sequence of images as it rotates. In this way, I can create animations that better show how a carving might look.
Here’s the above wreath heightmap, turned into a 3D model and then animated. The resulting GIF is over 5MB, so don’t click on it if you’re on a mobile connection!

Click to see animated GIF.
Why photos don’t work
A common question on CNC forums (and social media groups) is: “I have a photo of grandma. Can I do a carving of her face?” And whilst the simple answer is “yes, if it’s a greyscale image” that’s actually not helpful. Your machine will carve something … but almost certainly not what you expect.
For example … here’s a greyscale photo:

It’s quite a nice photo. It shows the facial contours OK, has some personality, and it’s easy to imagine how a sculpture of this might look! But if we feed this image into my tools, we can get a preview of how it would actually look:

Click to see animation (warning: nearly 5MB).
It’s the stuff of nightmares! For starters, the grainy effect of the photo has made for a very rough-texture cut. Your CNC will hate it! But even ignoring that, this data is just plain wrong.
There was a directional light in the photograph, which has put part of the face (particularly the left half of the nose) in shadow. This means that the engraving would make that half of the nose lower than the rest of the face! Also: look at the blemish on the cheek – this has now turned into a bullet wound! And the eyes? The pupils are very dark, so they’d be etched deep into the material. And the eyes have a glint on them (from lighting in the room) which translates to a very high etch.

Closeup of the 3D model data, from an oblique angle. Nose is wrong, blemish is a crater, eyes are terrifying. Click to see fullsize.
And the subject of this photograph is Caucasian. Can you imagine what would be engraved if the subject had darker skin, and a bright smile? Like a painting in a haunted house; but rather than “eyes that follow you around the room” it would be “teeth that follow you out of the room and chase you down the street”.
Bottom line: if an image has any hint of lighting, colour, shadow, or skin tone … it’s not a suitable candidate for a heightmap.
The human brain is great at looking at a 2D-image of a person and working out the shape of their face. You do it without thinking every time you watch TV; your brain has a database of face shapes as reference, collected from a lifetime of meeting people. But computers are notoriously bad for that sort of thing. You’re not going to have a program that can generate 3D model data or a heightmap from a 2D photograph any time soon.
Other problems with photos
Photographs often suffer from poor resolution, and have almost certainly been saved in JPEG – which is a lossy compression format. Therefore, the image will include extra dithering, unintentional patterns in blank areas, and corruption around areas of high contrast. All this corruption adds unwanted complexity to your engraving – you’ll lose your nice smooth contours, and give your CNC a hard time!
Good source images for engraving
So what sort of images should you use? The short answer is that the best images for sculpting are ones that have been made specifically for this purpose! The image needs to be stored in a lossless format (PNG, BMP, TGA, PPM) and must always have been thus, so that no compression artefacts have been introduced. It needs to be a nice, high resolution – pulling poor quality thumbnails from Google’s image search won’t do you any favours. You need to be making them yourself, or buying them from an artist who made them for exactly this task.
If you have an image you want to sculpt that doesn’t meet these criteria then you need to become comfortable with using image filters to smooth areas, and be prepared to spend a lot of time manually touching-up your source image. And never save your work as a JPEG.
Creating heightmaps from 3D objects
Some CNC software will let you generate heightmap data from 3D objects. This is probably the most ideal form of source data to work with, as 3D geometry can be scaled to fit your needs, whilst maintaining the highest quality.
If you don’t have software that loads 3D models, then it’s an interesting exercise to convert from one to the other. I’m a programmer by trade – so I tend to treat everything as a programming problem. I’ve found it helpful to generate heightmaps from 3D models.
3D graphics rendering is all about taking 3D geometry and turning it into a 2D image for display on a monitor. In order to know which triangles are hidden behind others, graphics rendering uses something called a “depth buffer” (also known as a “Z-buffer”) to keep track how far away each drawn pixel is from the viewpoint.
The depth buffer is a by-product of 3D rendering … but it’s exactly what we want for a heightmap! So I resurrected my old 3D rendering project from a few years ago, and modified the code so that I could save the depth-buffer as a bitmap along with the “proper” image. Here are some side-by-side comparisons of the rendered image against the depth buffer:

3D object rendered on the left, with the depth buffer on the right. Click to see full-size version.

I originally created this scene when I was writing my “lighting” code – but it works well at showing depth, too. Click to see full-size version.
(By the way: these images are quite good examples of the difference between a conventionally-lit image, and a heightmap.)
I find this very exciting, because I can make the image as high-detail as I like, guarantee that there’s no compression corrupting the bitmap quality, and can generate it from 3D model data (which can be scaled and rotated without affecting quality). And if I can use 3D model data, then I might be able to talk to some of my 3D-modelling colleagues about making me some cool designs!